Friday 27 August 2021

Is it the end of BernyEatsTheWorld?

February was the last time I managed to post something! February!?  I have been writing this blog for almost 12 years, with my first post written by a recently graduated and ready for the world 21 year old (and seemingly illiterate if you read that first post!).  This blogs soul purpose has always been to help me keep track of which National Dishes I have successfully ticked off.  The fact that people read it and I made enough money to buy myself a pint every now and then was just a nice bonus.  Of course it was not going to last forever, but when would be a good time to stop?!

Since leaving China, several events have brought me to this point in time.  A time where I haven't eaten a delicious aeroplane meal or smelt the sweet scent of mozzie repellent for over 2 years.  I have been busy though.  When we decided to come back to the UK we were absolutely adamant that it would not result in the end of our travels.  Covid-19, however, had other plans.  3 lockdowns later, a much more wonderful pause to our travels arrived in March in the form of our baby boy. 

What excites me now is to be able to share the world with him soon.  Had Covid not been such a pain I am sure he would have experienced his first plane ride by now but instead we have been staycationing it up.  I have no doubt that we will soon be back on our travels, but whether I will be writing like I used to is anybody's guess.  At the very least I will keep the national dishes checklist up-to-date.  At the very best I may write a couple of paragraphs and throw up a few pictures.  You never know, I could still be going for another 12 years.  Watch this space!   

Wednesday 24 February 2021

Korean Fried Chicken

I was surprised to see how popular fried chicken was in South Korea but the way they prepare it makes it 100% a South Korean speciality.  The star of this show is the sticky, sweet and spicy sauce that is unlike any other sauce that you have tasted.  I make the sauce quite regularly even if it is not for fried chicken!  Dip your chips in it or whack it into a stir fry; it is possibly my favourite sauce. 

Ingredients:

The Main

1 KG Chicken Thighs with bone (chicken wings or thigh fillets work too)

2 tbsp Rice Wine

1 tbsp dark soy sauce

1 tbsp Ginger paste

1 tsp salt

0.5 tsp pepper

1 cup corn/potato flour

Plenty of oil for deep frying

1 tbsp Toasted sesame seeds

2 chopped Spring onions

The Sauce

¼ cup Ketchup

¼ cup Honey

¼ cup Brown sugar

2 tbsp GoChuJang Chilli Paste (from your local Oriental Supermarket - No Substitutions!!)

2 tbsp dark Soy Sauce

2 tbsp garlic paste

1 tbsp Sesame Oil


Method:

The Sauce can be made ahead of time.  Simple as putting it all into a saucepan and bringing to a simmer for 10 minutes.  GoChuJang is a special Korean fermented chilli paste and is what gives the very unique flavour.  Your lock Oriental Supermarket will definitely have it as it is such a key ingredient in South Korean cuisine. 


Slice thighs in to two pieces close to the bone so you have boneless and bone pieces.

Marinade chicken pieces in the rice wine, ginger paste, salt and pepper for an hour and then dredge the chicken pieces in corn flour.  Keep the skins on!

Separate the bone and boneless pieces as they will cook at different times.  Fry the bone chicken for around 5 minutes and set aside.  Fry the boneless pieces for around 3-4 minutes.  Make sure not to overcrowd the pan.

The chicken may look a little anaemic still but don't worry.  It will go in for a second fry! Put the bone chicken back in the oil and fry until nicely golden and crispy.  This usually takes about 3-4 minutes.  Place the fried chicken on kitchen roll whilst you finish frying the rest of the chicken.

Warm the sauce up and once all the chicken is fried place it in a large bowl and pour over the sauce.  Toss the chicken in the sauce, sprinkle with the toasted sesame seeds and chopped spring onion and serve immediately.

For a vegan (and much healthier) alternative, roast a load of cauliflower florets until a little charred and crisp and stir fry it into the sauce (picture below)!  


Thursday 9 July 2020

Braised Pork on Rice - Lu Rou Fan (卤肉饭)

It may not be a National Dish but this is the ultimate comfort food and distinctly Taiwanese.  I first ate this in Taipei in a restaurant that cooked it up in big vats that were simmering away all day.  People queue out of the door where they are handed a little slip of paper and pencil to tick which sides they want with their steaming bowl of savoury pork.  It is traditionally cooked and served with whole boiled eggs but a gentleman next to me in the queue convinced me that a runny fried egg was the way to go.  The mix of salty belly pork, rice and silky egg yolk is just incredible and so my Lu Rou Fan is not cooked with boiled eggs.  You can boil and peel some eggs and add them at stage 7 if you wish. 

You really can't substitute belly pork for a leaner cut and you definitely can't swap out Shiitake Mushrooms for any other kind of mushroom.  In Chinese, Shiitake mushroom directly translates as "Fragrant Mushroom" and is where the main scent of the dish comes from.

Ingredients: (Serves 2-3)

The Bulk
1 Onion (diced)
500g Belly Pork
1 Pack of Shiitake Mushrooms (usually around 125g)
3 Cloves of Garlic (bashed)
3 Slices of fresh Ginger
1 Egg per person
Handful of fresh Chive

The Sauce
4 tbs Shaoxing Wine
3 tbs Dark Soy Sauce
2 tbs Light Soy Sauce
3 tsp Brown Sugar
2 Cups of Water

The Spices
2 tsp Sichuan Peppercorns
0.5 tsp Black Peppercorns
3 Star Anise
2 Sticks of Cinnamon
6 Cloves
3 Bay Leaves

Oil for frying

Method:


1) When using belly pork the Chinese always like to blanch the meat in boiling water to "remove impurities".  I don't know if this actually does anything but I tend to follow suit - it makes the dicing much easier either way.  Boil the meat for a few minutes and then dice into cm lardons.

2) Add a tablespoon of oil to a heavy bottom pan and fry the Sichuan Peppercorns, Black Peppercorns and Cloves.  Once fragrant, remove these spices from the oil and tie up in a cheese cloth - I find that my tea leaf infuser ball does the trick.  Ultimately these are the spices that nobody really wants to bite into, but are essential to flavour the dish.  Set this aside for later.

3) Add the rest of the spice ingredients to the oil and fry until fragrant once more.  Add the diced onion and fry for a few minutes.

4) Dice your Shiitake mushrooms and add to the pot.  Once everything has had time to fry for a few minutes add the diced pork belly.

5) De-glaze the pan with the Shaoxing wine before adding the two soy sauces and the sugar.  Simmer for a few minutes and then add the water.

6) Reintroduce the spices you fished out earlier in the cheese cloth and cover.  Simmer on low for 2 hours stirring occasionally. 

7) Remove the lid and crank the heat up to thicken the sauce (if needed!) to a consistency that will both sit on top of the rice and also slowly sink through it - In other words, you don't want a watery sauce!

8) Serve over plain boiled rice.  Fry an egg and place it on top.  Drizzle some sauce from the pan over the egg and then sprinkle generously with freshly chopped chives.

Any simple steamed green will go on the side quite easily.  Bok Choi is probably the vegetable of choice but broccoli or french beans work just as well.

Sunday 7 June 2020

Ras Malai Ice Cream (Cardamom Ice Cream)

At the risk of sounding completely up myself, my favourite ice cream is the one that I make.  It is a recipe that I came up completely by myself and after a few trials, it tastes exactly how I intended - like the Indian dessert called Ras Malai.

Now it's no secret, Indians don't do dessert very well.  Starters, mains, sundries - All incredible.  Dessert - Not so much, how is it possible that every single dessert in a country's cuisine tastes exactly the same as each other?!  That said, there is one hidden gem in there that doesn't instantly give you cavities.  Ras Malai consists of a kind of curdled cheese bathing in the most floral, fragrant, sweet milk you have ever tasted.  I know what you're thinking - Curdled cheese in a dessert?!  I'm thinking that too, but it was not the cheese that I had in mind when I set out to make this ice cream recipe, it was the incredible, sweet, cardamom milk.  Get ready for your new favourite flavour of ice cream.

Ingredients:

20g Peeled Pistachios

20g Cashew nuts

30g Almonds

10 cardamom pods

400ml Full-Fat Milk

300ml Double Cream

200ml Sweetened Condensed Milk

3 Egg Yolks

3 tbs White Sugar

0.25 tsp Salt

15g Butter

5 Threads of Saffron (optional)

Method: 


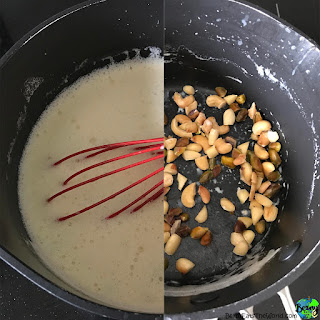
1) Roughly chop the nuts and toast them in a dry pan for a couple of minutes.

2) Peel the 10 cardamom pods and collect the seeds.  Grind the seeds to a powder in a pestle and mortar.

3) Add the butter and ground cardamom to the pan with the toasted nuts.

4) Cook on low for a few minutes before adding the milk, cream and condensed milk. 

5) Simmer and stir for 15 minutes.  Do not allow to boil.

6) Put the 3 egg yolks in a bowl with the sugar and whisk to a paste.

7) Pour the milk mixture through a sieve and set aside to cool down a little.

8) Pick out about half the nuts from the sieve and set aside.  Now I choose to peel the nuts at this point but it is probably unnecessary and takes forever.

9) Slowly add the warm milk mixture to the egg yolk bowl and whisk continuously.  Transfer to a pan and bring back to the heat.  Stir continuously until the mixture coats the back of a spoon.  Add the peeled nuts.

10) Transfer the mixture to your ice cream container and put in the fridge.

11) Once cool, put the mixture into your ice cream maker and follow the usual instructions.

12) Enjoy now and thank me later. 

Wednesday 13 May 2020

Hotel RRR Biryani


Hotel RRR - Mysore

I never realised the delicacy of a proper Biryani until my trip to India.  Firstly, I learnt that it is not a side dish! I think that I had only ever eaten it as a fancy add on instead of rice, but truth be told I don't think it ever really was proper biryani. At Hotel RRR in Mysore they served nothing but biryani and a few side dishes, alternating chicken and lamb each day.  It was carried in giant bags on the waiter's shoulders and poured directly onto your table (lined with banana leaves) for you all to tuck in.  

It is not simply rice and curry mixed together. It is a lengthy process that takes dedication and a good spice rack.  For this reason, most restaurants in England will make it completely incorrectly to save time, which results in a dish nowhere near as satisfying.  Like microwaving a jacket potato instead of baking it slowly; it makes ALL the difference.  Each individual grain of rice should be oozing with the most amazing fragrance made up from all the whole spices that have helped steam them.

Choose your cooking vessel carefully. It needs to be big enough to fit everything in and be able to go in the oven.  It also needs a tight fitting lid so the perfumed steam doesn't escape and so cooks the rice.  Some people use chapatti dough to seal the lid properly but foil works too.  I find that my cast iron casserole dish works perfectly.  It can be made on the stove but I have learnt the hard way that this method has a greater chance of burning the bottom before the rice on top is cooked.  So here are your 10 steps in making the perfect biryani. 


Ingredients: (Serves 6)


1Kg of lamb shoulder or chicken pieces (Keep the bone on and avoid breast meat)
6 Onions (sliced)
1-5 green finger chillies halved (you decide the heat)
4 Star Anise
2 big sticks of Cinnamon
8 Cloves
2 Teaspoons of Cumin seeds
5 Black Cardamom Pods
8 Green Cardamom Pods
10 Whole Black Peppercorns
5 Whole Dried Kashmiri Chillies
5 large Bay Leaves
2 tsp Curry Leaves
2 tsp ginger paste
2 tsp garlic paste
3 tsp ground cumin
2 tsp ground coriander
1 tsp ground turmeric
1/2 cup plain yogurt
3 cups rice
1 cup chopped fresh coriander
1/4 cup butter (or ghee)
Salt to taste
Plenty of oil

Optional:

1 large potato quartered and parboiled
4 boiled and peeled eggs (common with chicken biryani) 
1/2 cup Cashew nuts
Couple pinches of Saffron (or cheat with a couple of drops of red food colouring mixed with 2 tablespoons of water.)


Method:


1. Dry rub the meat with the ground cumin, coriander, turmeric and some salt.  Wash and leave the rice to soak in water.  Set both aside for an hour. 

2. Start frying four of the sliced onions in a separate pan with a bit of salt to help caramelise them.  These dark caramelised onions will be sprinkled on top of the biryani and will take a long time to get to the colour they need.  So start now and hopefully they will be done when you are ready for them. Once they are almost done, add the cashew nuts to brown slightly. 

3. Add half a cup of oil in the pot that you plan to make your biryani in.  Throw in 2 star anise, 1 cinnamon stick, 4 cloves, all the cumin seeds, 3 black cardamom, 4 green cardamom, 5 peppercorns, 3 chillies and 3 bay leaves.  

4. Fry until fragrant and then add the two remaining sliced onions and the split green chillies. There should be enough oil in the pan to fry everything properly rather than steam/boil them.

5. Fry the meat in a separate pan until brown and transfer to the main cooking pot.


6. Add the ginger and garlic pastes.  Give it 5 minutes and then add the yogurt (put the parboiled potatoes and/or eggs in at this point too).  Cook it through until the oil separates and the meat is soft.  We shouldn't have too much liquid so cook down until the sauce is thick.


7. In another pot add the remaining whole spices plus the curry leaves.  Fill with water and bring to the boil.  Add salt (or a chicken stock cube!) and add the rice. Only half cook the rice so it is still a little hard before draining.  Keep a cup and half of this drained fragrant rice water for later.  


8. Now it is time to construct!  Remove half of the meat mix from the biryani dish.  Layer half of the rice over the remaining meat in the pot.  Sprinkle with a few leaves of saffron (or your food colouring!) and add the rest of the meat mix layering it evenly. Top with the rest of the rice and sprinkle over the remaining saffron. 

9. Top it all off with the caramelised fried onions(and cashews) and the chopped fresh coriander.  Place cubes of butter on top and pour in a cup and a half of the saved rice water.

10. Finally bake for 40-50 minutes on gas mark 4. Test a few grains of rice; if still a little raw, add half a cup of water and put it back in the oven.  Rice on the edge of the pot may be crunchy but that's fine - it all adds to the overall texture of the dish! 

And that's it!  Your whole house smells like an indian restaurant and your hair is greasy with a fried onion stench but it will all be worth it.  It is a lot of work and so only really worth it when making a lot of it! In hotel RRR a biryani is served with a basic vegetable sambar or onion Raita with sides of salty pickles, deep fried crispy chillies, a couple of lime wedges and raw sliced onions.  Don't make the mistake of serving a heavy curry with it; the biryani is the star of the show and doesn't share the limelight well. Enjoy!

Thursday 9 April 2020

ChongQing Noodles (重庆面)

Having lived in Beijing for 5 years I have learnt what Chinese food is really supposed to taste like.  It's not fluorescent sweet and sour chicken balls or boiled ribs drenched in BBQ sauce.  Not once did I see any of that!  A lot of my favourite dishes come from the Sichuan Province and this dish was our go to at least once a week.

You will struggle to cook real Chinese food without a trip to your local Chinese supermarket.  My cupboard is always stocked with the Chinese staples of Sesame Oil, Dark Soy Sauce, Chinese ChinKiang Vinegar, ShaoXing Wine and Chinese Dried Chillies.  They last a long time and essential for all Chinese cooking.  The Chinese Chilli is mild and flavoursome and you could easily find 20+ chillies in a standard Sichuan dish.

Another essential is MSG which for absolutely no reason has a bad rep.  There are hundreds of scientific articles on how bad salt is for you and literally zero on MSG, but we all happily still use salt.  If you want to make good Chinese food, you will need MSG.

Ingredients: (Serves 2)

200 grams Dan Dan Noodles.  It has taken a few trials to work out the correct noodles.  Look for the chinese characters 担担面.

10 dried Chinese chillies (these and only these!)
2 tsp Sichuan Peppercorns
0.5 tsp Black Peppercorns
1 tbs ShaoXing Wine
4 tbs ground pork (I know, who buys pork mince in such small portions?! I have found that the meat from sausages also works brilliantly and they come perfectly pre-portioned! One sausage each.)
2 tsp Sesame Seeds
4 spring onions
0.5 cup chopped fresh Coriander
4 tbs cooked Soya Beans (optional)
Salt
Oil

Per bowl:
1 tsp Sesame Oil
1 tsp Dark Soy Sauce
1 tsp Light Soy Sauce
1 tbs Chinese Vinegar
1 tbs ShaoXing Wine
1 tsp MSG
0.25 tsp crushed raw garlic
0.5 tsp Sichuan "Toban" paste
0.5 tsp Chinese Chilli Oil.

Method:


Put all the "bowl" ingredients into the individual bowls that you will be serving the meal in.  Give it a good mix and set them aside.

Grind the 10 chillies, Sichuan Peppercorns and Black Peppercorns into a course powder.

In a tablespoon of oil, fry the pork for a minute and then add the ground spices.  Continue to fry until pork and spices are thoroughly cooked and almost crispy.  Add the sesame seeds to the pan, stir and deglaze with a splash of ShaoXing wine.  Turn off the heat.

Boil the noodles as instructed on the packet.  Place half in each bowl plus half a cup of the noodle water.  This noodle water is vital!

Top with the fried pork.  Sprinkle with a healthy amount of chopped spring onions and coriander.  Put 2 tablespoons of soya beans on the side.

Serve with the instruction to mix it all together before eating.


Sunday 15 March 2020

Nana's 6 onion Chicken Pathia

My Nana was born in Mangalore in India, got married young and moved to Kenya, leaving everything that she knew behind.  She had 6 children and a husband who's ambition was to get his family to the "Promised Lands" of the United Kingdom.  She has always been a brilliant cook but with over 60 years away from India her recipes have evolved and now at the ripe age of 85 there are just a few tried and tested recipes that remain.  I spent a day cooking one of her favourites with her a few weeks back and after a few attempts to remake it this is her  extra special Chicken Curry.  It follows no recipe that I know, but, tastes like the most incredible chicken Pathia you have ever eaten.  Like that classic hot, sweet, and sour you get from a British Indian restaurant's Chicken Pathia but homemade with a fraction of the sugar and oil used.

Ingredients:

The bulk
6 Onions
2 Peppers
1-5 Green Chillies (Depending how hot you like it - this dish is meant to pack a punch)
6 Chicken thighs (I prefer on the bone but fillets work just as well)
5 Garlic Cloves
1 inch piece of Ginger
1/4 cup of cooking oil (maybe more - I never actually measured)

The Sauce
2 tbs Tomato Puree
1 tbs Tamarind Paste
2 tbs Brown Sugar (or Jaggery if you have it!)
Chicken stock cube
Juice of one lime

The Spices
3 tsp Curry Powder (I use Madras hot curry powder)
1-2 tsp Kashmiri Chilli Powder (Kashimiri is for colour and flavour. Not heat)
1 tsp Turmeric Powder
1 tsp Coriander Powder
2 tsp Cumin Powder
1 Cinnamon Stick
1/2 tsp ground Black Pepper
Salt to taste.

Method:


1. Find someone to peel and dice the 6 onions for you.  Blend one of them with the ginger and garlic and set aside.  Dice the peppers, chunky chop the chillies - big enough for somebody to pick them out if they choose to.

2. Mix all the sauce ingredients and set aside.

3.  In your biggest pot, add the oil and fry the cinnamon stick for a minute.  Add the chopped onions. It will take time to fry this many onions properly but make sure that the onions are caramelising.  Add half a teaspoon of salt to help.

4. Add all the spices.  At this point you might need to add more oil if the pan gets dry.  Spices need to fry in oil so don't be afraid of it.  You are never going to add as much as your local takeaway does.  Fry for 5 minutes.

5. Add the diced peppers and fry.  Add the blended onion/ginger/garlic mix and fry thoroughly.  The main sweetness of this dish comes from this fried onion.  Steamed onion does not taste the same.  You should have a nice shine to the gravy.

6. Add the sauce mix and simmer for a few minutes.  Add the raw chicken and cook on a low simmer for 30 minutes.  Keep covered for the first 15 minutes.  If the sauce is looking thin then remove the lid to allow it to thicken.  If it is drying out just add water.